Tuesday, July 12, 2011

Chinese Dumplings

Chinese dumplings or potstickers can in a big batch and frozen before cooking. There's a variety of options for filling. We've used pork and chives, but we've also swapped out the chives for cabbage and use minced shrimp or chicken for the meat. The dumplings have two parts: the filling and the wrapper.


Filling

  • 1 lb ground pork
  • 1 egg (can omit for fatty meat)
  • canola oil
  • sesame oil
  • salt and pepper
  • soya sauce
  • 400 g chives (bunch should have 5 cm diameter)
  • 1 thumb ginger
  • 1 tsp Chinese cooking wine
  • 2 fragrant mushrooms (shiitake)

Our mushrooms were dried, so we soaked them in water to rehydrate


  • Chop all filling ingredients finely and mix together.
The completed filling

Wrapper
  • 5-6 cups flour
  • water
  • Add flour to a bowl.
  • Add 1 tbsp of water and mix. Keep adding water until fully moistened.
  • Knead.
Dough ready for kneading
  • On a floured work surface, roll out half of dough into a long cylinder.
  • Break in half lengthwise to make 2-3 cm thick.


  • Break off 2 cm pieces from each half.

  • Roll each piece into a ball.
  • On a heavily floured work surface, roll out each ball with a rolling pin. You can roll the pin back and forth with one hand and rotate the dough with the other hand. This technique will give your wraps thin edges to make it easier to seal your dumplings.


  • Hold a wrap on your fingers and add a scoop of filling.
  • Fold the wrap in half and pinch the edges to seal the dumpling. You can wrinkle the pinched edge and press it together to make a crescent shape.


  • Repeat until you've filled and sealed all of your wraps.


Now that you've made your dumplings, you can freeze them or cook them right away. You can either boil or fry your dumplings.

Boil
  • Fill a pot with enough water to submerge your dumplings.
  • Cover and bring to a boil on high heat.
  • When water boils, add 1 cup cold water and bring to a boil again.
  • Repeat this boil-add-water process until you've added 3 cups of water.
  • Once it boils again, remove from heat.
  • Remove dumplings with a slotted spoon and enjoy!


Fry
  • Heat a pan and add 1 tbsp oil.
  • Add your dumplings.
  • Cook until bottoms are browned.
  • Add enough water to cover the bottom of the pan.
  • Cover and cook until done.

Johnnycakes with Blueberry Sauce

While flipping through Joy of Cooking for a pancake recipe, I found recipes for cornmeal pancakes and then wandered further and found johnnycakes. The cornmeal pancakes weren't much like pancakes and it seemed like we'd be better off making the savory version to accompany a pork roast. Johnnycakes are even less like pancakes, but we liked them more than the cornmeal pancakes. They're still not a replacement for the traditional pancake, but they're an interesting change of pace.


I heated some frozen blueberries in a bit of water with brown sugar and vanilla to make a sauce.

Butternut Squash and Sweet Potato Soup with Chicken

This original pressure cooker recipe makes a simple but delicious butternut squash soup and also cooks some chicken to serve along side it. I used a Magic Bullet to do my blending, but an immersion blender, regular blender, or food processor should work great too. The final flavour of this soup is very strongly butternut squash with hints of the other vegetables, so beware of adding all of the squash to the soup unless you prefer a single flavour.


6 L pressure cooker -- 10 minutes and 4 minutes with 10 minute natural release.

Ingredients
  • 1 tbsp oil
  • 1/2 onion, diced
  • 4 cloves garlic, crushed and chopped
  • 2 zucchini, cut in half and sliced into 2cm-thick pieces
  • 1 large sweet potato, cut in half and sliced into 1.5cm-thick pieces
  • 8 chicken thighs (add as desired)
  • 1 cup chicken broth
  • poultry seasoning
  • salt and pepper to taste
  • 1 large butternut squash, peeled and quartered with seeds removed
Directions
  • Spread out your thighs and cut them to make flat pieces. The goal is to butterfly the thicker parts to make a single sheet of chicken of even thickness.
  • Pound chicken with the back of a knife or a meat mallet.
  • Lightly coat chicken with poultry seasoning.
  • Roll each thigh lengthwise.
  • Add oil to pressure cooker.
  • Set medium heat.
  • Add onions. Cook until browned.
  • Add garlic. Cook 1 minute.
  • Add rolled chicken on top of onions and garlic.
  • Add zucchini and sweet potato on top.
  • Add broth.
  • Add salt and pepper to taste. (1/2 tsp of salt is good.)
  • Cover and lock pressure cooker for high pressure.
  • Cook under pressure for 10 minutes. (Maybe too long?)
  • Remove from heat and let stand 10 minutes.
  • Quick release remaining pressure.
  • Your chicken will be cooked and your vegetables will be mush.
  • Remove vegetables to a large bowl and let cool.
  • Remove chicken to another bowl and cover.
The chicken is not necessary to the dish, but it's easy to cook along with the vegetables
  • If there's less than a cup of water left in the pressure cooker, add water.
  • Add a trivet and steam basket to pressure cooker.
  • Add squash with the insides facing up.
  • Cover and lock pressure cooker for low pressure.
  • Cook under pressure for 4 minutes.
  • Remove from heat and let stand 10 minutes.
  • Quick release remaining pressure.
  • Your squash will be firm (too firm to mash, but not chewy). You may want to continue cooking if you like your squash softer.
  • Remove squash to a bowl.
  • Remove cooking liquid to a pourable container (ex: a measuring cup).
  • Blend half of squash.
  • Blend vegetables.
  • Add blended vegetables to pressure cooker.
  • Add reserved cooking liquid to reach desired soup consistency.
  • Serve with rolled chicken and pieces of remaining squash.

Pork Wellington

As I mentioned before, I made pork Wellington in my cooking class at The Dirty Apron. I found the mustard seasoning and the mustard sauce made for too much mustard. I made it again at home and it was fantastic. This time I made a reduction out of guava and apple with a recipe I made up based on this Guava Reduction and this Guava Coulis.

Ingredients
  • pork tenderloin
  • puff pastry (I used 25 cm square sheets cut in half)
  • 1 tsp mustard
  • 1 tsp dried thyme
  • 1 egg
  • canola oil
  • salt
  • pepper

Directions
  • Preheat oven to 450 F.
  • Mix mustard and thyme in a bowl.
  • Cut pork into pieces that will fit your puff pastry. Ensure there is a lot of space at the ends of the pastry to make a seal. (If your pork is 3 cm thick, keep about 4 cm on each end of the pork.)
  • Dry pork with paper towel. (Extra moisture makes it harder to caramelize.)
  • Season pork with salt and pepper.
  • Heat a pan on high heat.
  • Add some oil.
  • Sear pork on all sides. (About 10 seconds per side.) Make sure the entire surface of the pork is seared.
  • Remove pork to mustard bowl and allow to cool.
  • Once cool, coat pork with mustard mixture.
  • In a small bowl, beat egg until smooth.
  • Place a sheet of pastry on a work surface.
  • Brush pastry with egg.
  • Place pork at bottom centre of pastry.
  • Roll the pastry to wrap the pork.
  • Press down on the ends to seal the pork. Fold the extra length for an additional seal. (Or pinch it for prettier presentation.)
  • Bake on parchment paper on a cooking sheet for 12-18 minutes (depending on the size of your pork pieces). Pastry should  be golden brown and a meat thermometer should read 145 F.
  • Allow to rest 5 minutes.
  • Garnish with apple-guava reduction, apple slaw, or some green apple mustard. I julienned 1/3 of the apple left from the reduction for garnish.


Apple-Guava Reduction

Ingredients
  • 2 ripe guava
  • 2/3 apple
  • water
Directions
  • Peel 2 guava and cut them in half. Put them in a pot.
  • Add almost enough water to cover.
  • Boil for 8 minutes.
  • Let cool. Meanwhile, prepare apple.
  • Blend guava and water until smooth.
  • Remove seeds with a sieve.
  • While guava cools, peel apple.
  • Slice the rest into 0.5 cm thin pieces and into 1 or 2 cm squares. Put them in a pot.
  • Add almost enough water to cover.
  • Add one tablespoon of brown sugar and one tablespoon of balsamic vinegar.
  • Add guava puree.
  • Simmer until reduced to 1/2.


Here's another pork Wellington I made with a pepper apple slaw. The slaw has black pepper, green onion, lime juice, and julienned apple.


Cooking Class

Recently, I attended a cooking class at The Dirty Apron. I took the "Meat Eaters Unite: The Meat Class." We cooked Olive Tapenade-crusted Lamb Chop, followed by a Pork Wellington with Black Pepper & Apple Slaw and Grainy Mustard Sauce, and finally a Rib-eye Steak. They also made us a creme-brulee and I got to burn my sugar.

The cooking area was great. The stations were large and there were two people to a station. Everyone had their own ingredients and just shared the oven and stove top.

The cooking classroom
The class was well-planned. Most of the grunt work (measuring, blending, some of the sauces) were done for us. The first dish, the lamb, was really easy to prepare (season, sear, spread with tapenade, sprinkle crust, and bake), and I think it was a great confidence booster that made the remaining dishes less daunting.

The lamb chops were piled high with greens

The pork Wellington was more complicated, but a lot of fun to make. Fortunately, the puff pastry was made for us.
Pork Wellington with lots of grainy mustard sauce, some apple chutney, and little puff pastry buttons

We actually started the rib-eye at the beginning by creating our maple-syrup-based marinade and then they were taken away to refrigerate until we were ready for them.
Rib-eye steak served over mashed potatoes, roasted mushrooms, and blanched green beans
Our teacher mentioned a few tidbits that I hadn't heard before:
  • Don't marinate with salt. It will dry out your meat. Season with salt right before cooking.
  • Let your meat rest after cooking. This will help to keep your meat juicy when you eat it instead of all the juices running out when you cut it.
  • Blanche green vegetables in salted water and then shock them in an ice bath.This helps keep them keep their green colour. Reheat them in hot water and saute in butter before serving.

Aerial view of the rib-eye
Overall, it was a great experience. We cooked with top quality ingredients (we used kurobuta pork in the Wellington) and got to eat everything we ate (more than enough for one meal). I had fun and learned something too.

Creamy Chicken Soup

When I was living as a bachelor, I received a great book as a present: The Big Book of One Pot. It's a collection of recipes that only require a single pot to cook and many are simple but delicious. Here's one of the soups: Chicken & Potato Soup with Bacon from page 51.

The soup from this recipe is good, but the bacon isn't great when having it for left overs. I should have cooked the bacon crispier or cut it into tiny bits.

Ingredients
  • 1 tbsp butter
  • 2 cloves garlic, chopped
  • 1 onion, sliced
  • 250 g cooked bacon, chopped
  • 2 leeks, sliced
  • 2 tbsp flour
  • 4 cups chicken broth
  • 800 g potatoes, roughly peeled and chopped
  • 200 g skinless chicken breast, chopped
  • 4 tbsp heavy cream
  • salt and pepper

Directions
  • Melt butter in pot.
  • Add onion and cook until softened (3 minutes).
  • Add garlic and cook for 1 minute.
  • Add bacon and leeks and cook for 3 minutes.
  • In a bowl, mix flour with enough stock to make a smooth paste.
  • Stir paste into pan.
  • Cook while stirring for 2 minutes.
  • Add remaining stock.
  • Add potatoes and chicken.
  • Add salt and pepper to taste.
  • Bring to a boil.
  • Lower heat and simmer for 25 minutes. Potatoes should be tender and chicken fully cooked.
  • Stir in cream and cook for another 2 minutes.
  • Remove from heat and serve immediately.
  • You can garnish with some cooked bacon or fresh parsley.


This post is based on a published recipe. Please be aware that we've bent the recipes to our will. If you'd like the original recipe, have a look at the cook book linked in the post.

Sweet Potato Pie

Yanna and I both love pumpkin pie, but we've have never had sweet potato pie. I've always wanted to try it because I love sweet potatoes. We had some sweet potatoes and I had some spare time, so I decided to make Joy of Cooking's recipe on page 686.


The recipe just tells you to make pumpkin pie, but replace the pumpkin with pureed sweet potato. Unsurprisingly, when Yanna tried some (and without me telling her what it was), she assumed it was pumpkin pie. You can taste the potato, but the difference is subtle (especially when I over do the spices).


Ingredients
  • 2 large sweet potatoes (peeled, halved, and cut into 2 cm thick slices)
  • 1 cup water
  • 1 pie crust (buy one or see page 665 of Joy of Cooking)
  • 3 eggs
  • 1 can (300 ml) of sweetened condensed milk
  • 1/2 cup brown sugar
  • 1 tsp ground cinnamon
  • 1 tsp ground ginger
  • 1/2 tsp ground nutmeg
  • 1/8 tsp allspice
  • 1/8 tsp ground cloves
  • 1/2 tsp salt
Directions
  • I cooked potatoes in pressure cooker. You could just boil them in a pot or cook them in the microwave.
  • low pressure. 
  • Add water to pressure cooker.
  • Add steam basket.
  • Add potatoes.
  • (Optional) Sprinkle potatoes with extra spices (from ingredients list).
  • Lock lid and set to low pressure.
  • Cook under pressure for 6 minutes.
  • Quick release pressure.
  • Drain.
  • Mash.
  • Separate the yolk and whites for one egg into two bowls. Yolk in small bowl and whites in large bowl.
  • Beat yolk.
  • Glaze pie crust with yolk.
  • Bake at 475 F for 10 minutes. Check it after 5 to prevent over baking. It should be golden when done. (Note that Joy of Cooking recommends a lot more details that might improve your pie crust.)
  • Reduce oven to 375 F.
  • Add remaining two eggs to egg white and whisk.
  • Add remaining ingredients and mix.
  • If your filling isn't smooth, then puree until smooth (I transferred to our Magic Bullet).
  • Pour mix into pie crust (which should be still hot).
  • Bake at 375 F for 35 to 45 minutes.

This post is based on a published recipe. Please be aware that we've bent the recipes to our will. If you'd like the original recipe, have a look at the cook book linked in the post.
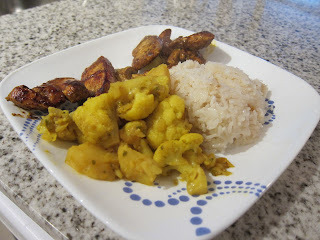
Aloo Gobhi

I don't like cauliflower at all. I don't like it raw or cooked. But I do like aloo gobhi. Yanna made this one from Jamie's Food Revolution with some chicken spiced with curry paste.


It's actually pretty bland on its own (we omitted mustard seeds), so we added some spicy mango chutney and it was great.

Jamaican Rice and Peas in a Rice Cooker

I love rice and peas, but I rarely use dried beans and I almost always cook rice in a rice cooker. So I've adapted Jamaica Travel and Culture's rice and peas recipe for my rice cooker. While I haven't perfected the timing and amount of liquid used in the recipe, in the end it was delicious.


Ingredients
  • 4 measures of rice (use your rice cooker's cup -- should be about 750 mL)
  • 1 can of beans (or pidgeon peas)
  • 1 can coconut milk
  • 5 cloves garlic (trim the tips off)
  • 3 green onions (keep the bulb, but trim the roots)
  • black pepper

Directions

  • Wash and drain the rice in the rice cooker pot.
  • Crush the green onions and add to rice.
  • Crush the garlic and add to rice.
  • Add coconut milk to rice.
  • Drain most liquid from beans and add beans to rice.
  • Add enough water to rice to fill above level 5. (Use the bean can to get some of that leftover bean liquid to give rice that purplish colour.)
  • Stir rice.
  • Grind some black pepper over the rice, to taste.
  • Close rice cooker and start cooking.
  • Rice will most likely not be done when the cooker finishes. Keep covered on the "keep warm" setting and stir rice every 5 minutes until cooked. If rice starts looking dry, add a splash of water.


Goes great with Jerk Chicken.

This post is based on a published recipe. Please be aware that we've bent the recipes to our will. If you'd like the original recipe, have a look at the website linked in the post.

Glico Curry

We went to a local Japanese restaurant recently and Yanna really enjoyed their curry. To replicate it, we went the easy way and bought some Glico curry roux. Eventually, I want to try making my own roux and see if I can replicate the Glico taste without the preservatives.


It's great as comfort food. The curry is delicious, but not overly spicy.


Here's a more detailed photo blog of making Glico curry. I made mine thicker than hers.