Friday, March 27, 2020

Lazy French Bread (using a food processor)

With everyone staying indoors to reduce the rate of COVID-19's spread, I see a lot of friends on Facebook making bread. I read an article titled "People are baking bread like crazy, and now we’re running out of flour and yeast." I kept thinking , "I have some yeast sitting in the back of my fridge." So finally I made bread! I used this recipe because it sounded easy (food processor bread blade for kneading instead of my poor over-washed hands).

My modifications: reduced the salt by 1 tsp and substituted 1/2 cup spelt flour for 1/2 cup of the all purpose flour. My son helped me make it so we also added raisins and cinnamon to one of the loaves.

Turned out pretty tasty, but since I didn't let it rise enough it was quite dense! The kids loved it (of course).

Sad that in these pandemic times, I may have a hard time refilling my low yeast and flour reserves. (At least I can eat!) Maybe I can convert my remaining yeast packet into a sourdough starter, but I don't really like sourdough...

You can see that my airpockets are nothing like SimpleEverydayHome's.
So if you love that fluffy French bread, then Let It Rise!

Ingredients

  • 4.5 cups flour and ~1 cup reserve
  • 0.5 cup spelt flour
  • 2.5 tsp salt
  • 1 packet or four and a half tsp yeast
  • 1 tbsp sugar


Equipment

  • food processor with dough blade
  • large glass bowl
  • microwavable measuring cup
  • oven
Shortly after adding to the oven. If you let yours rise, they'll be bigger than this.

Steps

  1. Preheat oven to 200° F and move the top rack to its lowest position.
  2. For crustier bread: put a metal pan at the bottom rack.
  3. Use your plastic dough blade in the food processor.
  4. Add 4.5 c flour, spelt flour, salt, sugar, yeast.
  5. Pulse to combine a bit.
  6. Heat 2 c of water in the microwave for 1 minute high -- enough to be hot but not burning (about 125° F).
  7. Add 2 tbsp olive oil into heated water.
  8. Turn on your blade while pouring the water-oil mixture through your pour hole.
  9. Spin for a bit more to get things mixed. Don't overwork your food processor.
  10. If the dough is still wet (likely it will be), add some reserved flour and spin some more. Repeat until you have a fairly smooth ball of dough.
  11. Don't add more flour than necessary. My dough was still a bit sticky.
  12. Add some olive oil to a large glass bowl.
  13. Rub the oil around the bowl.
  14. With your oily hand, transfer the dough from the food processor to the bowl.
  15. Wiggle the dough around and flip it over to get it coated in oil.
  16. Turn off the oven.
  17. Cover the bowl with a light metal lid and place it in the oven.
  18. Wait for 30 min or until doubled in size.
  19. Grease a large baking sheet while you wait.
  20. Once raised, punch down the dough and split into two pieces.
  21. Floured your counter and flatten one piece of your dough.
  22. Press it out to be 30 cm (a foot) wide, 1.5 cm (1/2") tall, and however long.
  23. Roll it up along the length. As you roll, pinch the bread together to reduce the spiral lines in the finished loaf. This part took pretty long and next time I'll rub the top with a bit of water and skip the pinching.
  24. Move the loaf onto your greased baking sheet and tuck the ends under for a squarer finish.
  25. Repeat for second piece. (Or additionally, sprinkle some raisins and cinnamon on top before you roll for a tasty low-sugar raisin bread.)
  26. With a sharp knife, cut diagonal slashes across the top of the loaves about 3 cm (1.2") apart.
  27. Wait for 30 min for it to rise again.
  28. Preheat oven to 375° F.
  29. Your loaves should have doubled in size. If you're impatient (like me) with this rise step and don't let them double, then your loaf will be dense but still enjoyable.
  30. For crustier bread: add 2 c water to the bottom rack metal pan.
  31. Bake for 27 minutes.
  32. Allow bread to cool 3 minutes before slicing.


Based on Simple Everyday Home's Homemade French Bread (food processor method).

Sunday, February 9, 2014

Sweet and sour pork (not deep fried)

When we eat at Manchu Wok we often get sweet and sour pork. However, at home, we rarely deep-fry anything, if at all. So when we have cravings for sweet and sour pork we go to this recipe adapted from Fuschia Dunlop's Land of Plenty.

Ingredients (Serves 2)

Sauce

3 tbsp white sugar
2 tbsp Chinkiang vinegar (chinese vinegar similar to balsamic, around $3 at T&T)
1 tsp light soy sauce
3 3/4 tsp cornstarch

Everything Else

3/4 lb pork loin boneless, cut into 1 inch cubes
five spice powder

1 onion, loosely chopped
3 cloves of garlic, sliced
1 thumb sized piece of ginger, minced

3/4 cup of chicken stock

1 green pepper
1 red pepper
pineapple chunks

some cilantro
sesame oil

Steps


  1. Cook rice
  2. Combine sauce ingredients to a smooth consistency and set aside.
  3. Cut the pork. Add thin layer of canola/vegetable oil to cover the pan, wait until it's hot and add chopped meat. Sprinkle some five spice powder on to the meat. Once the meat is seared, take out of the pan and set aside. (Don't overcrowd the pan, might have to do this in batches.) 
  4. Might have to add a little oil if pan is dry. Add onion, garlic, ginger into the pan. Cook until fragrant.
  5. Add chicken stock. Wait until boiled.
  6. Add sauce ingredients and stir quickly.
  7. Add meat, peppers, and pineapple. Cook until meat is done.
  8. Taste and add salt if needed. 
  9. Add chopped cilantro and some sesame oil. 
  10. Serve on rice

Tuesday, July 12, 2011

Chinese Dumplings

Chinese dumplings or potstickers can in a big batch and frozen before cooking. There's a variety of options for filling. We've used pork and chives, but we've also swapped out the chives for cabbage and use minced shrimp or chicken for the meat. The dumplings have two parts: the filling and the wrapper.

Filling

  • 1 lb ground pork
  • 1 egg (can omit for fatty meat)
  • canola oil
  • sesame oil
  • salt and pepper
  • soya sauce
  • 400 g chives (bunch should have 5 cm diameter)
  • 1 thumb ginger
  • 1 tsp Chinese cooking wine
  • 2 fragrant mushrooms (shiitake)

Our mushrooms were dried, so we soaked them in water to rehydrate


  • Chop all filling ingredients finely and mix together.
The completed filling

Wrapper
  • 5-6 cups flour
  • water
  • Add flour to a bowl.
  • Add 1 tbsp of water and mix. Keep adding water until fully moistened.
  • Knead.
Dough ready for kneading
  • On a floured work surface, roll out half of dough into a long cylinder.
  • Break in half lengthwise to make 2-3 cm thick.


  • Break off 2 cm pieces from each half.

  • Roll each piece into a ball.
  • On a heavily floured work surface, roll out each ball with a rolling pin. You can roll the pin back and forth with one hand and rotate the dough with the other hand. This technique will give your wraps thin edges to make it easier to seal your dumplings.


  • Hold a wrap on your fingers and add a scoop of filling.
  • Fold the wrap in half and pinch the edges to seal the dumpling. You can wrinkle the pinched edge and press it together to make a crescent shape.


  • Repeat until you've filled and sealed all of your wraps.


Now that you've made your dumplings, you can freeze them or cook them right away. You can either boil or fry your dumplings.

Boil
  • Fill a pot with enough water to submerge your dumplings.
  • Cover and bring to a boil on high heat.
  • When water boils, add 1 cup cold water and bring to a boil again.
  • Repeat this boil-add-water process until you've added 3 cups of water.
  • Once it boils again, remove from heat.
  • Remove dumplings with a slotted spoon and enjoy!


Fry
  • Heat a pan and add 1 tbsp oil.
  • Add your dumplings.
  • Cook until bottoms are browned.
  • Add enough water to cover the bottom of the pan.
  • Cover and cook until done.

Johnnycakes with Blueberry Sauce

While flipping through Joy of Cooking for a pancake recipe, I found recipes for cornmeal pancakes and then wandered further and found johnnycakes. The cornmeal pancakes weren't much like pancakes and it seemed like we'd be better off making the savory version to accompany a pork roast. Johnnycakes are even less like pancakes, but we liked them more than the cornmeal pancakes. They're still not a replacement for the traditional pancake, but they're an interesting change of pace.


I heated some frozen blueberries in a bit of water with brown sugar and vanilla to make a sauce.

Butternut Squash and Sweet Potato Soup with Chicken

This original pressure cooker recipe makes a simple but delicious butternut squash soup and also cooks some chicken to serve along side it. I used a Magic Bullet to do my blending, but an immersion blender, regular blender, or food processor should work great too. The final flavour of this soup is very strongly butternut squash with hints of the other vegetables, so beware of adding all of the squash to the soup unless you prefer a single flavour.


6 L pressure cooker -- 10 minutes and 4 minutes with 10 minute natural release.

Ingredients
  • 1 tbsp oil
  • 1/2 onion, diced
  • 4 cloves garlic, crushed and chopped
  • 2 zucchini, cut in half and sliced into 2cm-thick pieces
  • 1 large sweet potato, cut in half and sliced into 1.5cm-thick pieces
  • 8 chicken thighs (add as desired)
  • 1 cup chicken broth
  • poultry seasoning
  • salt and pepper to taste
  • 1 large butternut squash, peeled and quartered with seeds removed
Directions
  • Spread out your thighs and cut them to make flat pieces. The goal is to butterfly the thicker parts to make a single sheet of chicken of even thickness.
  • Pound chicken with the back of a knife or a meat mallet.
  • Lightly coat chicken with poultry seasoning.
  • Roll each thigh lengthwise.
  • Add oil to pressure cooker.
  • Set medium heat.
  • Add onions. Cook until browned.
  • Add garlic. Cook 1 minute.
  • Add rolled chicken on top of onions and garlic.
  • Add zucchini and sweet potato on top.
  • Add broth.
  • Add salt and pepper to taste. (1/2 tsp of salt is good.)
  • Cover and lock pressure cooker for high pressure.
  • Cook under pressure for 10 minutes. (Maybe too long?)
  • Remove from heat and let stand 10 minutes.
  • Quick release remaining pressure.
  • Your chicken will be cooked and your vegetables will be mush.
  • Remove vegetables to a large bowl and let cool.
  • Remove chicken to another bowl and cover.
The chicken is not necessary to the dish, but it's easy to cook along with the vegetables
  • If there's less than a cup of water left in the pressure cooker, add water.
  • Add a trivet and steam basket to pressure cooker.
  • Add squash with the insides facing up.
  • Cover and lock pressure cooker for low pressure.
  • Cook under pressure for 4 minutes.
  • Remove from heat and let stand 10 minutes.
  • Quick release remaining pressure.
  • Your squash will be firm (too firm to mash, but not chewy). You may want to continue cooking if you like your squash softer.
  • Remove squash to a bowl.
  • Remove cooking liquid to a pourable container (ex: a measuring cup).
  • Blend half of squash.
  • Blend vegetables.
  • Add blended vegetables to pressure cooker.
  • Add reserved cooking liquid to reach desired soup consistency.
  • Serve with rolled chicken and pieces of remaining squash.

Pork Wellington

As I mentioned before, I made pork Wellington in my cooking class at The Dirty Apron. I found the mustard seasoning and the mustard sauce made for too much mustard. I made it again at home and it was fantastic. This time I made a reduction out of guava and apple with a recipe I made up based on this Guava Reduction and this Guava Coulis.

Ingredients
  • pork tenderloin
  • puff pastry (I used 25 cm square sheets cut in half)
  • 1 tsp mustard
  • 1 tsp dried thyme
  • 1 egg
  • canola oil
  • salt
  • pepper

Directions
  • Preheat oven to 450 F.
  • Mix mustard and thyme in a bowl.
  • Cut pork into pieces that will fit your puff pastry. Ensure there is a lot of space at the ends of the pastry to make a seal. (If your pork is 3 cm thick, keep about 4 cm on each end of the pork.)
  • Dry pork with paper towel. (Extra moisture makes it harder to caramelize.)
  • Season pork with salt and pepper.
  • Heat a pan on high heat.
  • Add some oil.
  • Sear pork on all sides. (About 10 seconds per side.) Make sure the entire surface of the pork is seared.
  • Remove pork to mustard bowl and allow to cool.
  • Once cool, coat pork with mustard mixture.
  • In a small bowl, beat egg until smooth.
  • Place a sheet of pastry on a work surface.
  • Brush pastry with egg.
  • Place pork at bottom centre of pastry.
  • Roll the pastry to wrap the pork.
  • Press down on the ends to seal the pork. Fold the extra length for an additional seal. (Or pinch it for prettier presentation.)
  • Bake on parchment paper on a cooking sheet for 12-18 minutes (depending on the size of your pork pieces). Pastry should  be golden brown and a meat thermometer should read 145 F.
  • Allow to rest 5 minutes.
  • Garnish with apple-guava reduction, apple slaw, or some green apple mustard. I julienned 1/3 of the apple left from the reduction for garnish.


Apple-Guava Reduction

Ingredients
  • 2 ripe guava
  • 2/3 apple
  • water
Directions
  • Peel 2 guava and cut them in half. Put them in a pot.
  • Add almost enough water to cover.
  • Boil for 8 minutes.
  • Let cool. Meanwhile, prepare apple.
  • Blend guava and water until smooth.
  • Remove seeds with a sieve.
  • While guava cools, peel apple.
  • Slice the rest into 0.5 cm thin pieces and into 1 or 2 cm squares. Put them in a pot.
  • Add almost enough water to cover.
  • Add one tablespoon of brown sugar and one tablespoon of balsamic vinegar.
  • Add guava puree.
  • Simmer until reduced to 1/2.


Here's another pork Wellington I made with a pepper apple slaw. The slaw has black pepper, green onion, lime juice, and julienned apple.


Cooking Class

Recently, I attended a cooking class at The Dirty Apron. I took the "Meat Eaters Unite: The Meat Class." We cooked Olive Tapenade-crusted Lamb Chop, followed by a Pork Wellington with Black Pepper & Apple Slaw and Grainy Mustard Sauce, and finally a Rib-eye Steak. They also made us a creme-brulee and I got to burn my sugar.

The cooking area was great. The stations were large and there were two people to a station. Everyone had their own ingredients and just shared the oven and stove top.

The cooking classroom
The class was well-planned. Most of the grunt work (measuring, blending, some of the sauces) were done for us. The first dish, the lamb, was really easy to prepare (season, sear, spread with tapenade, sprinkle crust, and bake), and I think it was a great confidence booster that made the remaining dishes less daunting.

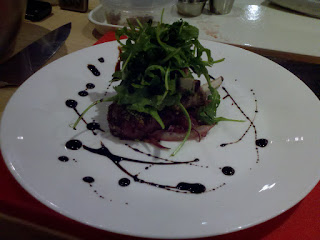
The lamb chops were piled high with greens

The pork Wellington was more complicated, but a lot of fun to make. Fortunately, the puff pastry was made for us.
Pork Wellington with lots of grainy mustard sauce, some apple chutney, and little puff pastry buttons

We actually started the rib-eye at the beginning by creating our maple-syrup-based marinade and then they were taken away to refrigerate until we were ready for them.
Rib-eye steak served over mashed potatoes, roasted mushrooms, and blanched green beans
Our teacher mentioned a few tidbits that I hadn't heard before:
  • Don't marinate with salt. It will dry out your meat. Season with salt right before cooking.
  • Let your meat rest after cooking. This will help to keep your meat juicy when you eat it instead of all the juices running out when you cut it.
  • Blanche green vegetables in salted water and then shock them in an ice bath.This helps keep them keep their green colour. Reheat them in hot water and saute in butter before serving.

Aerial view of the rib-eye
Overall, it was a great experience. We cooked with top quality ingredients (we used kurobuta pork in the Wellington) and got to eat everything we ate (more than enough for one meal). I had fun and learned something too.